
Managed ETL using AWS Glue and Spark
Managed ETL using AWS Glue and Spark

ETL, Extract, Transform and Load workloads are becoming popular lately. An increasing number of companies are looking for solutions to solve their ETL problems. Moving data from one datastore to another can become a really expensive solution if the right tools are not chosen. AWS Glue provides easy to use tools for getting ETL workloads done. AWS Glue runs your ETL jobs in an Apache Spark Serverless environment, so you are not managing any Spark clusters by yourself.
In order to experience the basic functionality of Glue, we will showcase how to use Glue with MongoDB as a data source. We will be moving data from MongoDB collections to S3 for analytic purposes. Later on, we can query the data in S3 using Athena, interactive query service which allows us to execute SQL queries against the data in S3 buckets. We will use AWS CDK to deploy and provision necessary resources and scripts.
For this tutorial, we will be using CData JDCB driver. If you want to follow the same process, you need to contact CData customer support to get your authentication key for a trial.
After the imports and environment variables, we need to establish a connection to the Spark cluster, which AWS is running for us in the background. After that, we will be looping over provided MongoDB collections to read collection into data frames. At last, we will loop over these data frames and write them in S3 bucket as a final location in CSV format.
We can now continue with the provisioning necessary AWS resources. CDK currently supports Cloudformation version of AWS Glue package. We will use those to provision Glue Job and a scheduler.
At first, we are creating an S3 bucket for storing our JDBC driver, Spark script and the main destination for MongoDB collections. We add our dependencies (JDBC driver and Spark scripts) via s3Deployment package inside CDK. This will upload all necessary files during the bootstrapping period. Next, we are creating an IAM role for the Glue job, so it can interact with files in the S3 bucket. After that, we will be creating the main Glue Job, which its job to run the script using our dependencies. And for the last step, we add a scheduler to invoke Glue Job every 60 minutes.
For deploying:
# Install dependencies
npm install
# Create .env file
AWS_REGION="us-east-1"
AWS_ACCOUNT_ID=""
RTK=""
MONGO_SERVER=""
MONGO_USER=""
MONGO_PASSWORD=""
MONGO_PORT=""
MONGO_SSL=true
MONGO_DATABASE=staging
COLLECTIONS="users,readers,admins"
BUCKET_NAME="mongo-glue-etl"
# Bootstrap resources
cdk bootstrap
# Deploy using CDK CLI
cdk deploy
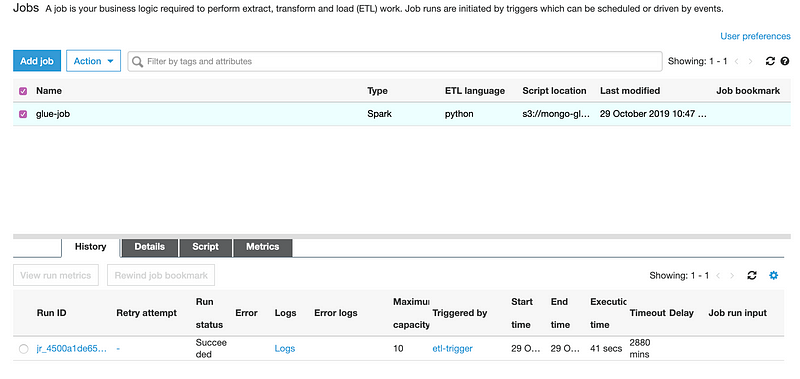
After the deployment is finished, head over to the Glue console. You should be seeing your job run by a scheduler every hour. Select the Job on Glue console and run it manually for now. After some time, your job should be finished and you should see the status Succeeded for the run. You can also check the logs in Cloudwatch to see what AWS Glue does that in background.
Head over to the S3 console to see transformed data.
To remove this stack completely, you need to manually delete S3 bucket and run CDK command to delete the deployed Stack.
cdk destroy
And that’s it, that was easy to setup. By using managed services your company can spend more time on product features, instead of managing the underlying infrastructure or software.
The completed project can be found in our Github repository.