
Serverless Kubernetes with Amazon EKS
Serverless Kubernetes with Amazon EKS
The term Serverless does not mean that there are no servers involved at all. As many people are still confused with the fairly new term, we would like to clarify that first; Serverless is a cloud execution model in which the cloud provider runs the server, and dynamically manages the allocation of machine resources and low-level operations. The serverless model abstracts away the complexity of running distributed systems on the cloud and provides easy to use application interfaces. Serverless offerings on AWS include AWS Lambda, DynamoDB, S3 and Fargate.
In this tutorial, we are going to deploy a Serverless Kubernetes cluster on Amazon Elastic Kubernetes Service(EKS) using Cloud Development Kit(CDK) and we will leverage AWS Fargate to power-up container workloads on EKS. AWS Fargate provides on-demand, right-sized compute capacity for containers. With Fargate, you no longer have to provision, configure, or scale groups of virtual machines to run containers. This removes the need to choose server types, decide when to scale your node-groups or optimize cluster packing. AWS announced the EKS Fargate compatibility at the end of last year and it hasn’t got any sizeable attraction yet. We are going to take a look at the basic example and discuss the potential benefits and shortcomings of using Fargate with EKS.
For this tutorial, you need AWS CDK CLI, previously set AWS credentials and kubectl installed locally.
Let’s start with describing the main CDK Stack that we are going to use.
We are creating a VPC first, next necessary IAM roles and security groups, then we are creating an EKS cluster with a default Fargate profile, and lastly, we are adding two Kubernetes resources(deployments) to newly created cluster for testing purposes. We are using the “ecr-assets” package from CDK, it automates the building Docker images locally and pushing them to Elastic Container Registry(ECR) repositories before we deploy our stack.
This helper function will return a Kubernetes deployment template for a given application.
Follow the steps for deployment.
# Install dependencies
npm install
# Provide AWS account ID and AWS region as environment variables
vim .env
# Bootstrap the environment before the deployment
cdk bootstrap
# Deploy using CDK CLI.
cdk deploy
Now that deployment has finished, you should be seeing two commands on your screen.
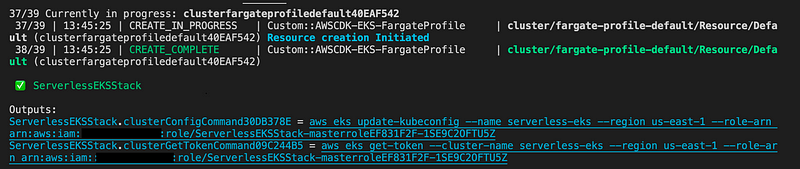
Use the first command to setup kubectl configuration. After that, we are ready to interact with our cluster.
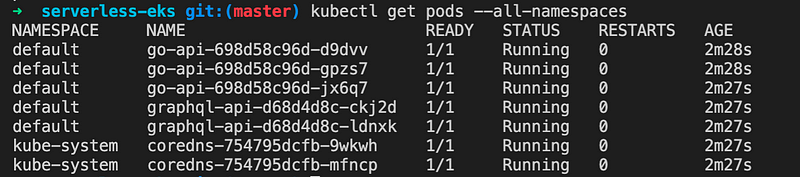
kubectl get pods
You would see that pods would not get scheduled and will be shown as in “Pending” state.


Now we have to delete and re-create any existing pods so that they are scheduled on Fargate nodes. Otherwise, pods including the “coredns” pods, will be stuck in “Pending” state.
# Reschedule deployments in kube-system namespace
kubectl rollout restart deployments -n kube-system
# Reschedule deployments in default namespace
kubectl rollout restart deployments
After that, check the pods again, they should be in “Running” state. Currently, pods running on Fargate are only supported on private subnets
Let’s check what type of worker nodes that are running.
kubectl get nodes

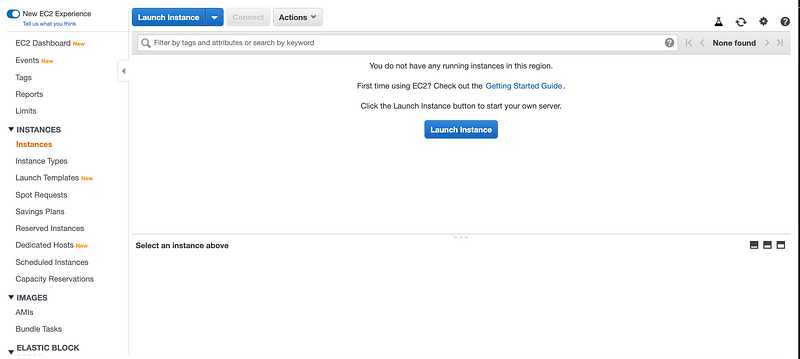
We can also check for if any EC2 instances are running in the background.
We are going to use the port-forward command to expose deployment to our localhost environment.
# Forwards pods to localhost
kubectl port-forward deployment/go-api 8080:8080
kubectl port-forward deployment/graphql-api 8090:8090
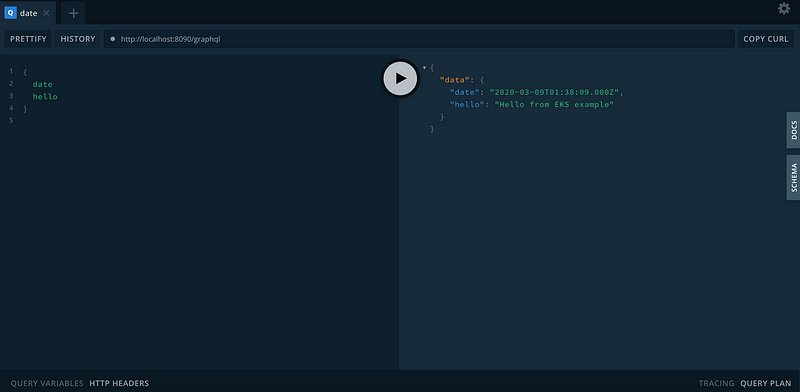
Let’s visit the “graphql-api” service.
All good, you can start playing with the new Serverless cluster. Create deployments, delete pods and see how EKS would manage the worker nodes. You can also create multiple Fargate profiles and schedule pods directly to them using different selectors. If a pod matches multiple Fargate profiles, EKS picks one of the matches at random.
Don’t forget to remove the stack once you are done with it.
# Destroy the CDK Stack
cdk destroy
Now that we have a working example, let’s discuss the potential benefits and shortcomings.
Why you should use EKS with Fargate?
- You don’t want to manage any worker-nodes and you want to have a Serverless offering which will minimize the effort of maintaining resources.
- You want to leverage the Kubernetes ecosystem.
- You want to pay per vCPU and memory usage and not for the whole instance.
- You want better isolation, as each pod scheduled on Fargate node does not share the underlying kernel, CPU resources, memory resources, or elastic network interface with another pod.
Why you should avoid using EKS with Fargate?
- No support for stateful workloads that require persistent volumes or file systems.
- 4 vCPU and 30Gb memory per pod hard limit.
- No Daemonsets, Privileged pods support.
- No GPU support.
- Classic Load Balancers and Network Load Balancers are not supported on pods running on Fargate. Ingress with ALB Ingress Controller is possible.
- Pods are not scheduled immediately, you will have to wait around a minute for a pod to be scheduled on a Fargate node.